Managing inbound emails can be time consuming, and hard to prioritize when on a tight schedule. You have emails coming in from leads and customers, software notifications, newsletters and subscriptions, social media updates, billing confirmations, appointment reminders, promotions, and the list goes on. In order to be efficient, there must be some type of organizational system. Outlook, as well as most other email providers, allows users to create “rules” to filter inbound emails into specific folders. Below are the instructions for Outlook 2013:
- Click on an email you would like to create a rule for. For example, an email from a certain sender that you would like to route into a separate folder.
- Under the home tab, click “Rules,” then “Create Rule.”
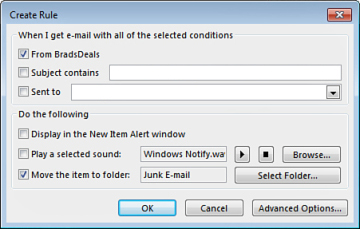
- Select the conditions for the filters by clicking the check boxes. You can choose to filter emails from a certain sender, keywords in the subject, or who the email was originally sent to.
- In the “Do the following” section, choose what you would like Outlook to do with messages that meet the above conditions. To move the message to a different folder automatically, specify the folder in the last option.
- Click OK, and OK again if you would like to run the rule immediately.
- To manage or delete existing rules, go to Home > Manage Rules and Alerts.

