Quick Action Updates
Two updates have been added to Quick Actions. The settings on Quick Actions can be updated in Administration > Quick Actions.
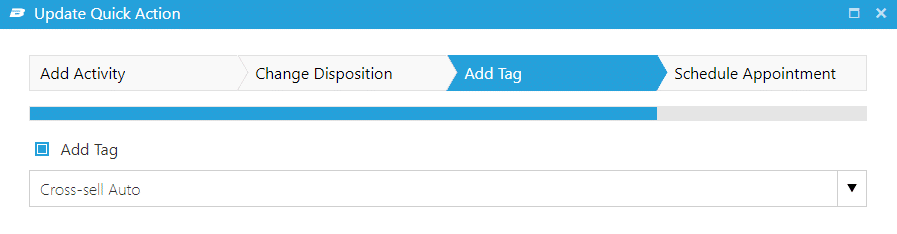
- Add Tag – Tags can now be applied to a lead when a Quick Action is used. To add a tag to your Quick Action, click “Add Tag” in the dropdown within the Quick Action’s settings, then select the tag to be applied.

- Appointment Attendee – When creating an appointment via a Quick Action, you can now choose the attendee for the appointment. The attendee is the user’s calendar that the appointment will be added to. The options include:
- Assigned To User – The appointment will be added to the Assigned User’s schedule
Note: If the lead is not assigned, the Quick Action will trigger an error when used - Quick Action Author – The appointment will be added to the user’s schedule who used the Quick Action
- Assigned To User And Quick Action Author – The appointment will be added to both the Assigned User’s schedule, and the user’s schedule who used the Quick Action
- Assigned To User Or Quick Action Author – By default, the appointment will be added to the Assigned User’s schedule. If the lead is not assigned, or is assigned to an inactive user, the appointment will instead be added to the user’s schedule who used the Quick Action.
- Assigned To User – The appointment will be added to the Assigned User’s schedule
For more information on Quick Actions, check out our help desk.
Apply Quick Actions in Bulk on Lead List
Quick Actions can be applied to multiple leads at a time using the checkboxes on the Lead List page (this is an Admin only feature).
- Open a list of leads from the Lead menu or Dashboard.
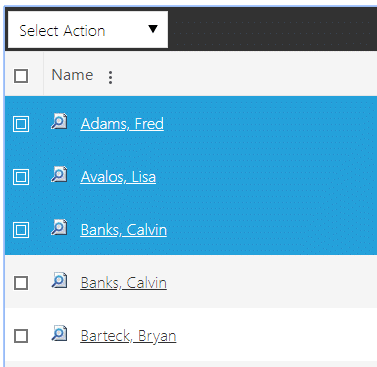
- Select the leads you would like to apply the Quick Action to. This can be done by either clicking individual check boxes next to leads, or clicking the top check box in the header bar to select all leads on the page. If all are selected, you also have the option to select all within the filtered results, as opposed to only the leads on the current page.

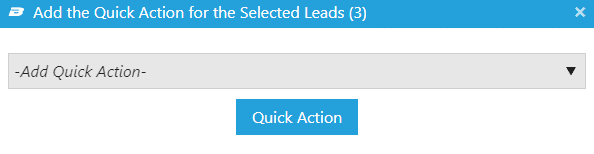
- In the “Select Action” dropdown above the selected leads, choose “Quick Action.” Select the Quick Action you would like to apply to the selected leads, and click “Quick Action.”

- If you open one of the leads, you will see the applied Quick Action in the “History” tab. Any updates within the Quick Action settings will be applied.
Opportunity Default Settings
Additional settings have been added for each Opportunity category, allowing default values to be applied to the Opportunity when the category is selected. This saves time filling out information about the Opportunity every time if your pricing and sales cycles are fairly consistent for each product/service you offer. For each category, you can now set defaults for the following:
- Value – This is the cost of your product/service. It’s recommended to set a default value if you offer the same rate each time this product/service is sold.
- Quantity – This is the number of products/services being sold. This is generally defaulted to “1” unless products are sold in a specific bulk.
- Type – This is the billing cycle (one time, monthly, quarterly, bi-annually, or yearly) associated with the value and quantity.
- Sales Cycle Days – This is the average number of days from quote to sale, and will set your “Estimated Close Date” on the Opportunity. For example, if you enter 15 days as a default, when you create a pending opportunity on 10/1, the estimated close date will be 10/15. The estimated close date determines where the projected sale appears in Opportunity reports.
- Chance to Win – This is the percentage chance that the sale will be closed, and will affect sales projections in Opportunity reports. For example, if you set all Opportunities to 50%, the report will project that you’ll sell 50% of pending Opportunity values. For the default, it’s recommended to enter your average close ratio for the product/service.
To make changes to your Opportunity categories, go to Administration > Opportunity Categories and click the edit pencil next to the category you wish to edit. To create a new category, click “Add New Category” in the back menu bar.
For more information on Opportunities, check out our help desk.
