Tagging
Blitz Sales Follow-Up Software has added a new feature to help businesses better organize their leads by tagging. This is similar to tagging in blogs, twitter, etc. and allows businesses to group leads by any criteria they choose (e.g. “Monoline auto” or “Hot lead). Leads can have multiple tags, enabling them to be better defined and included in more filters and searches based on the chosen criteria.
Set up tagging:
- Create tags. Create tags in Administration > Lead Tags and click +Add New Record. You are able to choose a color to create a visual for simple lead tracking (e.g. “Hot” can be red, “Cold” can be blue, etc.)
- Tag leads. To tag a lead, pull up the individual’s Lead Log. At the top, click the check box to the left of “Show Tags.” Below, and +Add New Tag dropdown box will appear, allowing you to select a tag for the lead.
- Pull lists of leads with certain tags.
ROI Report
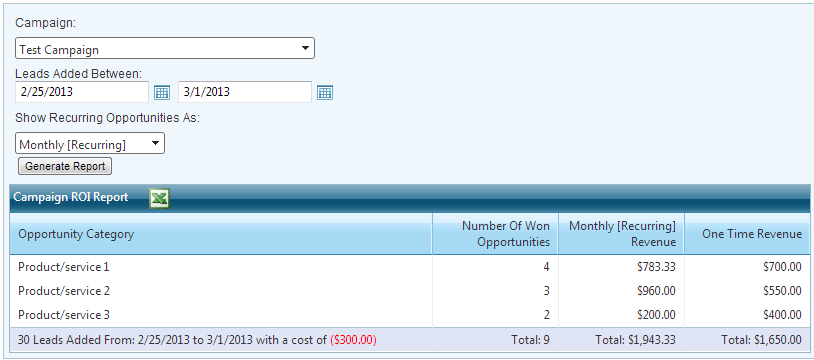
Users are now able to measure the return on investment for each campaign, allowing businesses to easily gauge where they are getting sales from. Below are instructions on setting up and using this feature:
-
- Add the average cost per lead. Go to Administration > Manage Campaigns, click the edit pencil next to the campaign, and enter the Avg. Cost Per Lead.
- Add opportunities to leads. If you are not already using the opportunity tool within the lead log, this must be updated in order to create an accurate ROI report. Click here for more information about adding opportunities.
NOTE: The report will only display Won Opportunities. Pending or Lost Opportunities will not be factored into the ROI report. - Run the ROI report. Go to Administration > Reporting > Campaign ROI. Select a campaign, a date range, and how the recurring opportunities should be displayed. Click Generate Report.
- Add the average cost per lead. Go to Administration > Manage Campaigns, click the edit pencil next to the campaign, and enter the Avg. Cost Per Lead.
New Workflow Functions
Two new Workflow functions are available:
- Workflow can now reassign leads to a different user. For example, if a lead is still “new” after two days, Workflow will automatically reassign it to someone else. This function requires an auto assign group to be set up.
- Lead Tags (above) are now a filter. For example, all leads with the “Hot Lead” tag will receive a set of emails until they are reached.
Lead Log Enhancement
A close button has been added to the detail box in the Lead Log. Refreshing the page or moving to the next lead will bring the box back.
Schedule Enhancement
Within the Lead Log, the Showing Appointments line has been changed from a date range to a simpler format. Users can select to view:
- All Appointments
- Appointments this month
- Upcoming appointments for the next year
- Upcoming appointments for the next 30 days
- Previous appointments from the past year
- Previous appointments from the past 30 days


