Enhancement to CallFire integration
Blitz Sales Follow-Up Software and CallFire‘s integration has been updated, creating a seamless transfer of leads from Blitz to Call Fire. Users are now able to choose and call leads directly from Blitz using the autodialing function of their CallFire account. During the calls users can update leads within Blitz, schedule appointments, leave voicemails, and move to the next call all from one convenient screen. There is also new reporting available to track call dispositions within Blitz. Below are instructions on setting up and using this integration.
Setup Instructions:
- Within Blitz: In Administration > My Company click the checkbox next to “Enable CallFire Dialer Integration.” Click Save. A button will appear that says “Link CallFire Account(s).” Click that button.
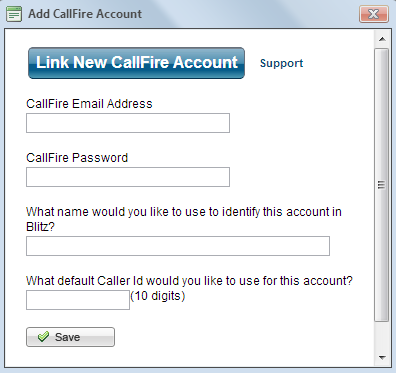
- Within the “Linked CallFire Accounts” screen, click “+ Link New CallFire Account.” Type in your CallFire login email address and password, a name to identify the account in Blitz, and the default caller Id number to be used. Click Save.
- Repeat step 2 for each CallFire account you have.
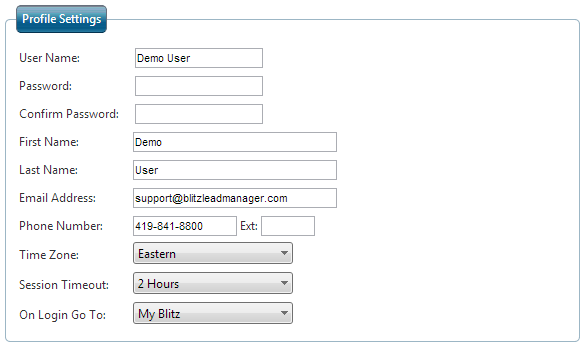
- Add your direct phone number to the “Profile Settings” section of your My Profile page. This will pre-fill the phone number field when dialing (step 6 of Dialing Options, below).
Dialing Instructions (click images to enlarge):
- Within Blitz: Go to Leads > Lead List.
- Select the Blitz campaign that you would like to begin calling. Apply any necessary filters (by clicking “Show Filter Options”) if you would like to narrow down the list.
- Click the “Create CallFire Dialing Campaign” button.
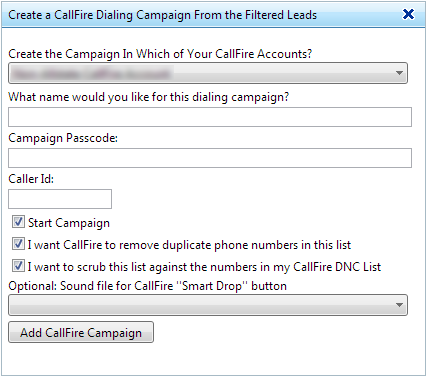
- In the popup screen, choose the account you are dialing from. Once this is selected, additional options will appear below. Create a name for the dialing campaign, a passcode, and the Caller Id number to be used. Click “Add CallFire Campaign.”
- A red notification will appear above the lead list that says “Successfully created the CallFire Campaign with # Leads. Start Calling Now!”
- Clicking “Start Calling Now” will begin the dialing session. First, enter your phone number and verify that the information is correct. Click Next.
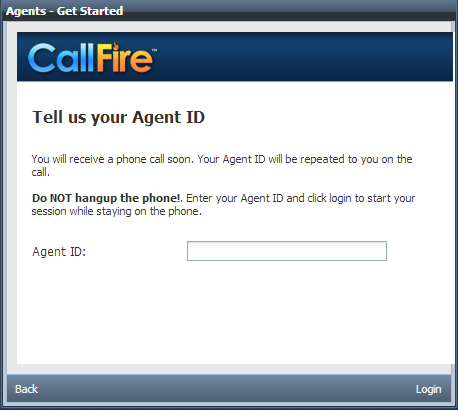
**NOTE: If you enter your phone number in the My Profile screen, this number will be pre-filled automatically. See Step 4 in the Setup Instructions above. CallFire will now call the phone number you entered in the previous step. When you answer the phone, enter the Agent Id given. Click Login.
- At this point, CallFire will begin dialing. Once connected, the section on the right displays your calling options – you are able to move to the next call, leave a voicemail (SmartDrop), and hang up the call. The section on the left provides a “Link 1” tab, which will display the Blitz lead log for the prospect you are connected with. You are able to update their history, appointments, details, etc. from the lead log during the call.
- In addition to any updates you make, CallFire will add a note to the lead with a calling disposition such as No Answer, Busy, etc. This note will not affect neglected leads or the status/milestone in Blitz. To update the status and/or milestone, you must add a history note or use a quick add.
Accessing Existing Campaigns & Reporting
- Start the campaign by clicking the green play button next to the campaign. If you have already called from this campaign, it will begin where you left off.
- View the call results by clicking the magnifying glass icon next to the campaign. This will display the total number of phone numbers in the list, total calls made, and the total number of each disposition added.
- Delete or edit campaigns.
- You can also view call results in Administration > Reporting > Call Result. This information is able to be exported to Excel.
Phone Number in My Profile
Blitz Lead Manager has also added a phone number field to each user’s My Profile. By adding your phone number to the My Profile screen, it can be automatically substituted into email templates and/or call scripts. To add a lead substitution, simply select it within the dropdown box when creating an email template or call script.


